Step 1
Add a Checkbox element to the form, then go to the Settings for it and make the following changes.
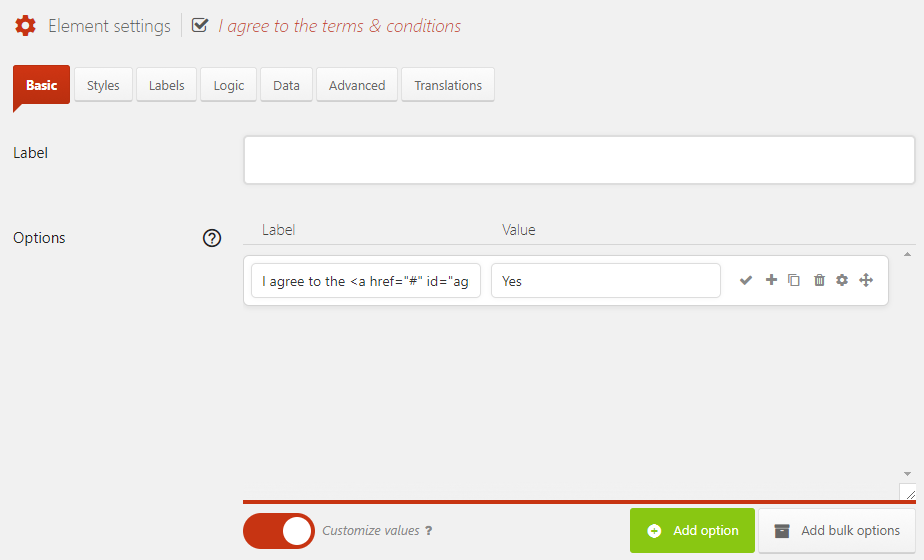
- Set the Label to be empty
- Set the Required setting On
- At the Options setting, remove the other options so that there is just a single option
- Set the Customize values setting to On
- Set the Label of the the one remaining option to
I agree to the <a href="#" id="agree-terms">terms & conditions</a> - Set the Value of the the one remaining option to
Yes - On the Labels tab, set the Admin label to
I agree to the terms & conditions
The settings should look like the image below when you are finished.
Step 2
Add an HTML element to the form, then go to the Settings for it. For the HTML setting add the following code.
1
2
34
5
| <div id="the-terms"> Paste the HTML for the terms and conditions here. </div> |
<div id="the-terms">

Paste the HTML for the terms and conditions here.
</div>
- On line 3 paste in the HTML for your own terms and conditions
Then go to the Advanced tab and copy or remember the unique ID for the HTML element (e.g. 1_4).
Step 3
Go to Forms → Settings → Custom CSS & JS, in the Custom CSS (All devices) field enter this code:
1 2 3 | .quform-element-1_4 { display: none; } |
.quform-element-1_4 {
    display: none;
}- On line 1, replace
1_4with the unique ID of the HTML element from Step 2
In the Custom JavaScript field enter the code below. The code depends on what popup script is currently active on the site. You can check this on the Forms → Settings → Tweaks & Troubleshooting tab. Make sure the option Enable popup script is On and depending on the value of the Popup script setting, get the relevant code for the popup script from the tabs below.
1 2 3 4 5 6 7 8 | jQuery(function ($) { $('#agree-terms').fancybox({ type: 'inline', href: '#the-terms', maxWidth: 800, maxHeight: 600 }); }); |
jQuery(function ($) {
    $('#agree-terms').fancybox({
        type: 'inline',
        href: '#the-terms',
        maxWidth: 800,
        maxHeight: 600
    });
});1 2 3 4 5 6 7 8 9 | jQuery(function ($) { $('#agree-terms').fancybox({ inline: true, href: '#the-terms', autoDimensions: false, width: 800, height: 600 }); }); |
jQuery(function ($) {
    $('#agree-terms').fancybox({
        inline: true,
        href: '#the-terms',
        autoDimensions: false,
        width: 800,
        height: 600
    });
});1 2 3 4 5 6 7 8 | jQuery(function ($) { $('#agree-terms').magnificPopup({ items: { type: 'inline', src: '#the-terms' } }); }); |
jQuery(function ($) {
$('#agree-terms').magnificPopup({
items: {
type: 'inline',
src: '#the-terms'
}
});
});When using Magnific Popup you might need to add extra CSS to style the popup content. Add the CSS code below to the Custom CSS (All devices) field and adjust it to suit.
1 2 3 4 5 6 7 8 | #the-terms { position: relative; background: #FFF; padding: 30px; width: auto; margin: 20px auto; max-width: 600px; } |
#the-terms {
    position: relative;
    background: #FFF;
    padding: 30px;
    width: auto;
    margin: 20px auto;
    max-width: 600px;
}