In this guide we will have a small form to gather some data from the user then when the user submits the form they are redirected to a second larger form with the previously submitted data already populated.
Step 1
Create a page for the second form if you haven’t done so already, we’ll need a page to select in Step 2.
Step 2
Create the first form. In this example we’ve created a form with a Text element where the user enters their name and an Email element where the user enters their email address. While editing the form go to Setting → Confirmations, and at the Default confirmation click the settings (cog) icon.
Choose Type: Redirect to another page and choose the page for the second form created in Step 1.
At the option Query string type in this code:
n=
Then click the Insert variable menu (code icon) and choose the name Text field. Then type in this code:
&e=
Then click the Insert variable menu (code icon) and choose the Email address field.
The final query string will look similar to this:
n={element|id:3|Name}&e={element|id:4|Email address}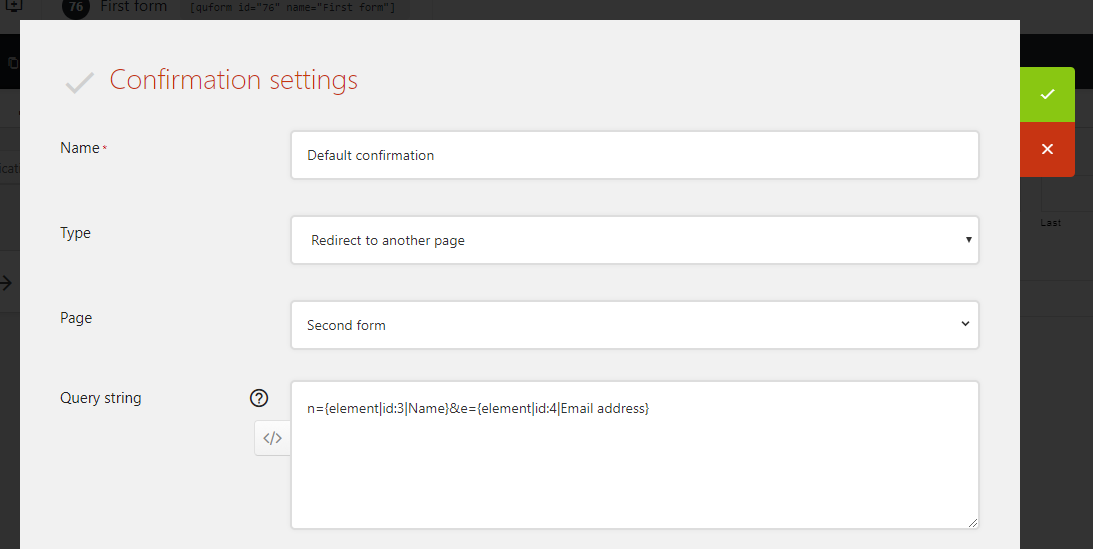
Note for Checkbox fields
To get checkbox values to pass properly, make sure that the Value of each of the options are the same in both forms, and you’ll also need to modify the variable tag slightly. The original variable will look similar to this:
{element|id:5|Checkbox}Before the last curly bracket, add |separator:, so that it becomes:
{element|id:5|Checkbox|separator:,}Note for Date fields
To get date values to pass properly, you’ll need to go to the Date element settings, and on the Data tab set the Date format (PHP) to Y-m-d
Note for Time fields
For locales that don’t express time in 24 hour format, you’ll need to go to the Time element settings, and on the Data tab set the Time format (PHP) to H:i
Step 3
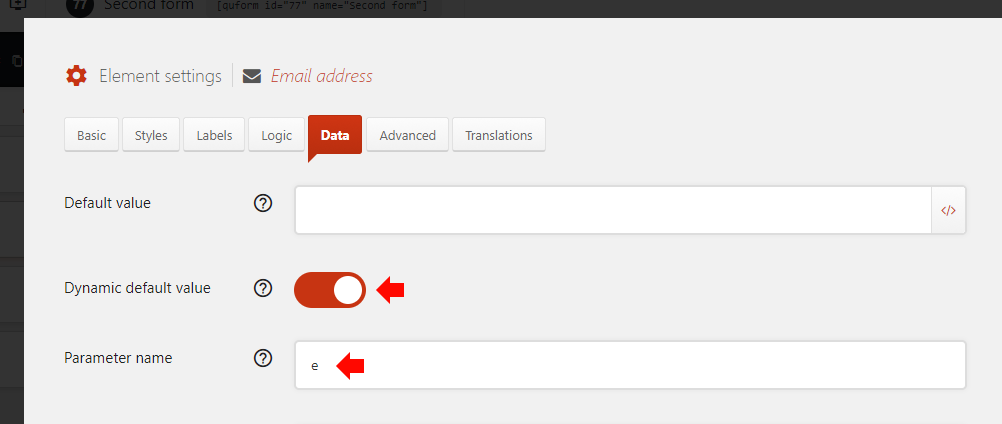
Create the second form. Use the same type of fields than you used in the first form for the fields to populate, and add any further fields as needed. For each of the fields you want to populate, go to the settings for them then the Data tab, then enable the Dynamic default value option. For the Parameter name field enter the character before the equals sign in the Query string option in Step 2.
For the name Text field enter the parameter name n and for the Email field enter the parameter name e
That’s it! Test it out by submitting the first form and see if the data ends up populated in the second form.