This guide will show you how to add a new contact to Campaign Monitor when a user submits a Quform form.
Add the following code to the WordPress theme functions.php file (or create a plugin for it).
1234 5 6 7891011 12 13 14 15 16 17 18 19 20 21 22 23 | add_filter('quform_post_process_1', function (array $result, Quform_Form $form) { $apiKey = 'yourApiKey'; $listId = 'yourListId'; $subscriber = array( 'EmailAddress' => $form->getValueText('quform_1_4'), 'Name' => $form->getValueText('quform_1_3'), 'Resubscribe' => true, 'RestartSubscriptionBasedAutoresponders' => true, 'ConsentToTrack' => 'Yes' ); $url = sprintf('https://api.createsend.com/api/v3.2/subscribers/%s.json', $listId); wp_remote_post($url, array( 'headers' => array( 'Authorization' => 'Basic ' . base64_encode($apiKey . ':x') ), 'body' => wp_json_encode($subscriber) )); return $result; }, 10, 2); |
add_filter('quform_post_process_1', function (array $result, Quform_Form $form) {    $apiKey = 'yourApiKey';    $listId = 'yourListId';
    $subscriber = array(
        'EmailAddress' => $form->getValueText('quform_1_4'),
        'Name' => $form->getValueText('quform_1_3'),        'Resubscribe' => true,        'RestartSubscriptionBasedAutoresponders' => true,        'ConsentToTrack' => 'Yes'    );

    $url = sprintf('https://api.createsend.com/api/v3.2/subscribers/%s.json', $listId);

    wp_remote_post($url, array(
        'headers' => array(
            'Authorization' => 'Basic ' . base64_encode($apiKey . ':x')
        ),
        'body' => wp_json_encode($subscriber)
    ));

    return $result;
}, 10, 2);- On line 1, replace the number
1with the form ID - On line 2, replace
yourApiKeythe Campaign Monitor API Key (see below) - On line 3, replace
yourListIdthe Campaign Monitor List ID (see below) - On line 6, replace
1_4with the Email element unique ID - On lines 7, replace
1_3with the Name element unique ID if the form has a Name element, otherwise this line can be removed
How to get your Campaign Monitor API Key & List ID
API Key
See this page for how to get your Campaign Monitor API Key.
List ID
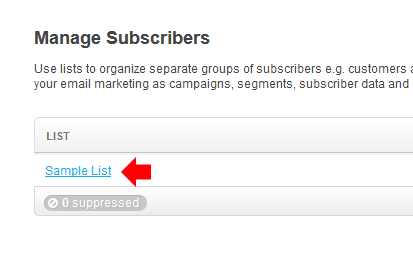
Log in to Campaign Monitor and go to Lists & subscribers.

Click into the list you want to add the subscriber to.
Click change name/type.
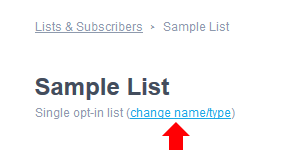
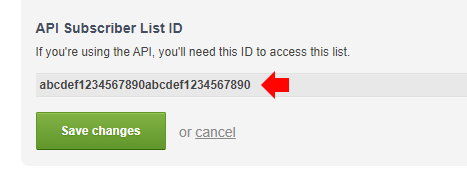
At the bottom of this page you will find the List ID.
Custom fields
To save form data into Campaign Monitor custom fields you will need to modify the $subscriber array in the code above, by adding a new CustomFields entry. Configure the custom fields as shown below, the Key is the name of the custom field within Campaign Monitor, and the Value is the form value to save into this field.
1 2 3 4 5 6 7 8 91011 12 131415 16 17 | $subscriber = array( 'EmailAddress' => $form->getValueText('quform_1_4'), 'Name' => $form->getValueText('quform_1_3'), 'Resubscribe' => true, 'RestartSubscriptionBasedAutoresponders' => true, 'ConsentToTrack' => 'Yes', 'CustomFields' => array( array( 'Key' => 'My Custom Field 1', 'Value' => $form->getValueText('quform_1_5') ), array( 'Key' => 'My Custom Field 2', 'Value' => $form->getValueText('quform_1_6') ), ) ); |
$subscriber = array(
    'EmailAddress' => $form->getValueText('quform_1_4'),
    'Name' => $form->getValueText('quform_1_3'),
    'Resubscribe' => true,
    'RestartSubscriptionBasedAutoresponders' => true,
    'ConsentToTrack' => 'Yes',
    'CustomFields' => array(
        array(
            'Key' => 'My Custom Field 1',            'Value' => $form->getValueText('quform_1_5')        ),
        array(
            'Key' => 'My Custom Field 2',            'Value' => $form->getValueText('quform_1_6')        ),
    )
);- On line 9, replace
My Custom Field 1with the name of the first custom field - On line 10, replace
1_5with the unique ID of the form element that you want to save into the first custom field - On line 13, replace
My Custom Field 2with the name of the second custom field - On line 14, replace
1_6with the unique ID of the form element that you want to save into the second custom field - Add additional Key/Value arrays to the
CustomFieldsarray to save additional custom fields