To save submitted form data to a custom database you can either use the built in options at Edit Form → Settings → Database, or use custom code instead for more control. In both cases you will need to manually create the database table and columns.
Creating the database table and columns
You can use a tool such as phpMyAdmin to create the table and columns, it should be available via your hosting control panel with most hosting companies, or you can use the plugin WP phpMyAdmin.
If you aren’t familiar with creating MySQL tables, there are many tutorials and videos available for this on the web.
Using the form builder UI
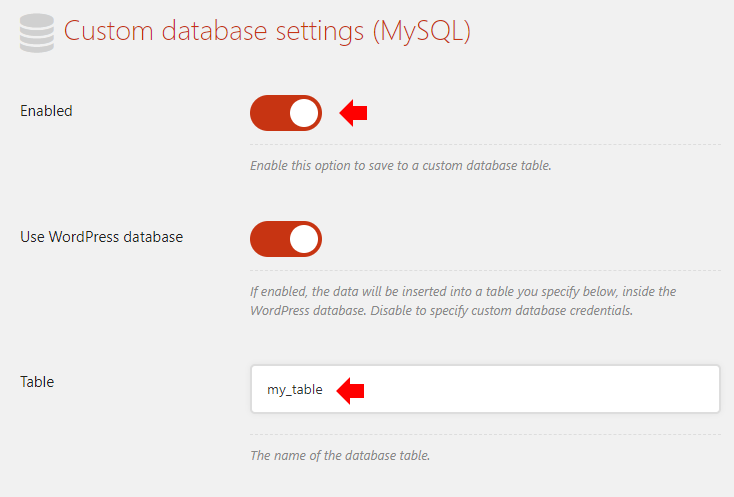
Go to Edit Form → Settings → Database and turn on the Enabled option, then enter the name of the table in the Table field. If you are using a database other than the database where WordPress is installed, turn off the Use WordPress database option and configure the credentials.
Now, at the What to save section, click Add column button then enter the column name in the Column and at the Value field you can either enter a static value or click the code icon button next to the field (insert variable), and choose a submitted value or other variable to save into this column.
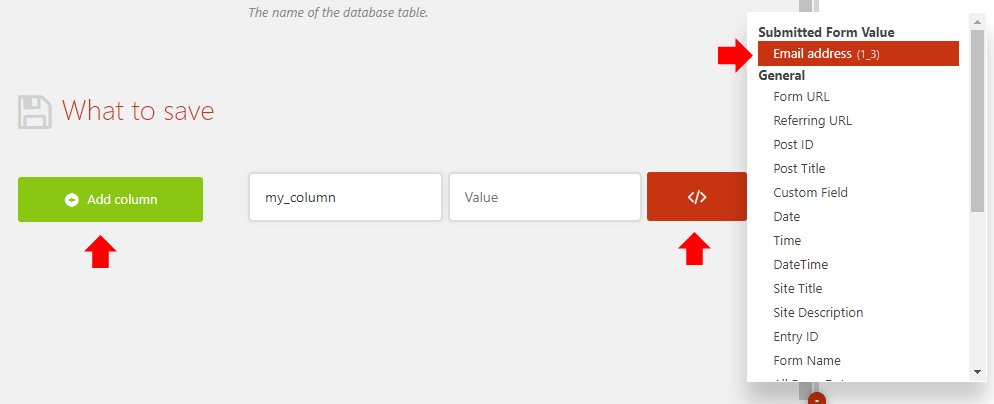
Continue to add columns in this section for each piece of data you want to save in the database table.
See the Variables page for more information about available variables.
Using custom code
For more control you can use PHP code to save the data to the database instead of using the form builder UI. This will allow to use conditionals and save additional data that isn’t accessible from the UI.
Add the following code to the WordPress theme functions.php file (or create a plugin for it).
12 3 4 56789 10 1112 13 14 | add_filter('quform_post_process_1', function (array $result, Quform_Form $form) { global $wpdb; $data = array( 'email' => $form->getValueText('quform_1_3'), 'name' => $form->getValueText('quform_1_4'), 'date' => $form->getValueText('quform_1_5'), 'time' => $form->getValueText('quform_1_6'), ); $wpdb->insert('my_table', $data); return $result; }, 10, 2); |
add_filter('quform_post_process_1', function (array $result, Quform_Form $form) {    global $wpdb;

    $data = array(
        'email' => $form->getValueText('quform_1_3'),        'name' => $form->getValueText('quform_1_4'),        'date' => $form->getValueText('quform_1_5'),        'time' => $form->getValueText('quform_1_6'),    );

    $wpdb->insert('my_table', $data);
    return $result;
}, 10, 2);- On line 1, replace the number
1with the form ID - On line 5, replace
emailwith the name of the first database table column, and replace1_3with the unique ID of the element to save to this column - Repeat the above step for lines 6-8, you can add more columns by adding more lines to this array
- On line 11, replace
my_tablewith the name of the database table
Troubleshooting
If there was a problem inserting the data, WordPress will usually log this as an error. Temporarily enable debug logging, submit the form again and then check the wp-content/debug.log file for the error message. Once you are happy that everything is working, you can turn off debug logging.