This documentation page is for Quform version 1 and may not be applicable for Quform 2 click here to visit the documentation for Quform 2.
![]()
This guide will show you how to create a checkbox that the user must tick to indicate that they agree with your terms and conditions, and will display a link to the terms that will open in a popup window.
Step 1
Create a HTML file containing your terms and conditions and save it as terms.html and upload it to the root of your website so that it resides at http://example.com/terms.html – a sample page is below.
1 2 3 4 5 6 7 8 9 10 11 12 13 | <!DOCTYPE html> <html> <head> <meta charset="UTF-8"> <title>Terms and conditions</title> </head> <body> <div> <h2>Terms and conditions</h2> <p>Lorem ipsum dolor sit amet, consectetur adipiscing elit. Ut auctor elementum convallis. Suspendisse in leo libero, a auctor tellus. Integer convallis dictum ultricies. Curabitur fringilla, magna sed porta auctor, ligula lectus eleifend nunc, pulvinar elementum massa ipsum ut quam. Curabitur odio felis, pharetra vitae tristique at, euismod eu leo. Proin sollicitudin ullamcorper nibh, ut auctor orci tincidunt in. Aenean sed purus ac neque facilisis rhoncus eu at dui. Nulla tincidunt massa sit amet nibh ornare iaculis. Vivamus at mauris quis ipsum tristique interdum. Proin consequat molestie erat vel malesuada. Sed molestie risus eu leo lobortis gravida. Morbi sit amet erat arcu, at auctor quam. Sed tincidunt eros a felis pretium sodales non nec neque. Aliquam erat volutpat.</p> </div> </body> </html> |
<!DOCTYPE html>
<html>
<head>
<meta charset="UTF-8">
<title>Terms and conditions</title>
</head>
<body>
<div>
    <h2>Terms and conditions</h2>
    <p>Lorem ipsum dolor sit amet, consectetur adipiscing elit. Ut auctor elementum convallis. Suspendisse in leo libero, a auctor tellus. Integer convallis dictum ultricies. Curabitur fringilla, magna sed porta auctor, ligula lectus eleifend nunc, pulvinar elementum massa ipsum ut quam. Curabitur odio felis, pharetra vitae tristique at, euismod eu leo. Proin sollicitudin ullamcorper nibh, ut auctor orci tincidunt in. Aenean sed purus ac neque facilisis rhoncus eu at dui. Nulla tincidunt massa sit amet nibh ornare iaculis. Vivamus at mauris quis ipsum tristique interdum. Proin consequat molestie erat vel malesuada. Sed molestie risus eu leo lobortis gravida. Morbi sit amet erat arcu, at auctor quam. Sed tincidunt eros a felis pretium sodales non nec neque. Aliquam erat volutpat.</p>
</div>
</body>
</html>Step 2
Add a Checkboxes element to the form and go to the settings for it. On the first settings tab, do the following:
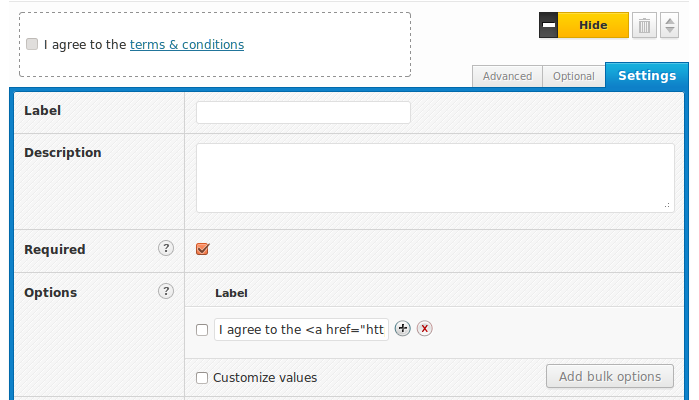
- Make the Label setting empty
- Tick the Required setting
- Remove the existing options until you are left with just one, set the option Label to the code below, change the URL http://example.com/terms.html to the URL of your terms page from Step 1
1 | I agree to the <a href="http://example.com/terms.html" onclick="window.open(this.href, 'terms','width=500,height=400,left=300,top=300,scrollbars=yes');return false;">terms & conditions</a> |
I agree to the <a href="http://example.com/terms.html" onclick="window.open(this.href, 'terms','width=500,height=400,left=300,top=300,scrollbars=yes');return false;">terms & conditions</a>
There is no point in showing this field in the email or saving it to the database. Because the element is required you can be sure that each submitter has agreed to the terms. On the Optional settings tab, do the following:

- Tick the Do not show in the email setting
- Untick the Save value to database setting