This documentation page is for Quform version 1 and may not be applicable for Quform 2 click here to visit the documentation for Quform 2.
Step 1
Get your Campaign Monitor API key. You can find it using this guide.
Step 2
Get your Campaign Monitor List ID.
How to find your Campaign Monitor list ID
Step 1
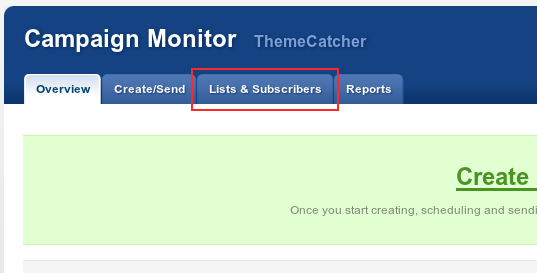
Log in to Campaign Monitor and go to the “Lists & Subscribers” tab
Step 2
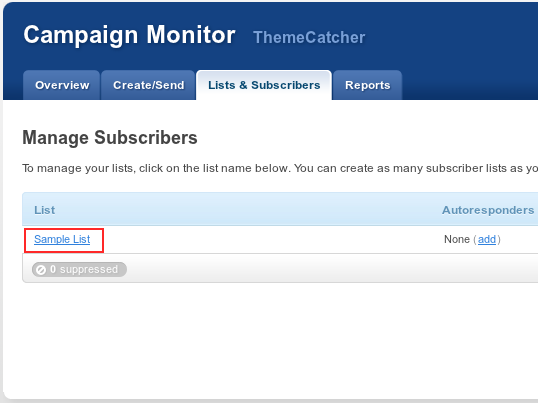
Click on the name of the list
Step 3
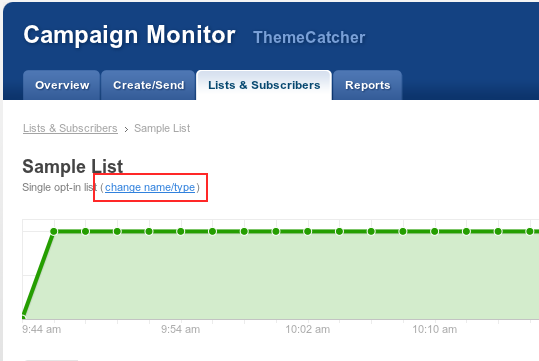
Click “change name/type”
Step 4
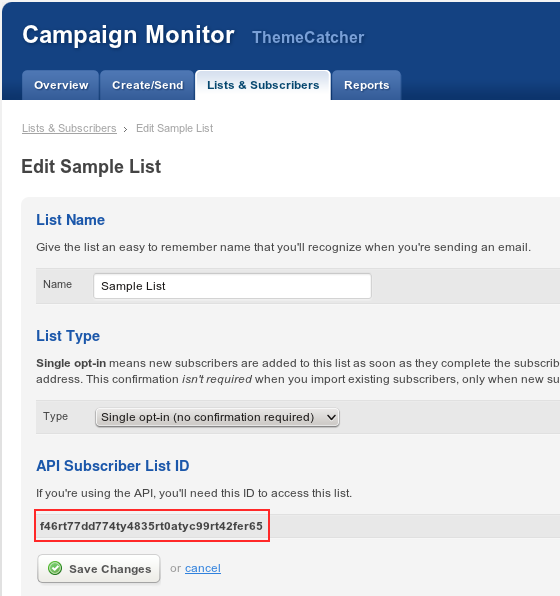
The list ID is at the bottom of this page
Step 3
Download the Campaign Monitor API PHP wrapper from here. Click the ![]() button to download. Extract the downloaded .zip file and rename the extracted folder to campaignmonitor. Upload this folder to your wp_content/themes/YOUR_THEME/ folder.
button to download. Extract the downloaded .zip file and rename the extracted folder to campaignmonitor. Upload this folder to your wp_content/themes/YOUR_THEME/ folder.
Step 4
Get the unique ID of your Quform form, see Finding the form ID.
Step 5
Get the unique ID of your Quform “Name” field, see Finding the unique element ID.
Step 6
Get the unique ID of your Quform “Email” field, see Finding the unique element ID.
Step 7
Add the following code to the wp-content/themes/YOUR_THEME/functions.php file (or create a plugin for it).
12 3 4 5 6 789 1011 12 13 14 15 16 | add_action('iphorm_post_process_3', 'my_save_to_campaignmonitor', 10, 1); function my_save_to_campaignmonitor($form) { require_once dirname(__FILE__) . '/campaignmonitor/csrest_subscribers.php'; $subscriberName = $form->getValue('iphorm_3_1'); $subscriberEmail = $form->getValue('iphorm_3_2'); $wrap = new CS_REST_Subscribers('YOUR_LIST_ID', 'YOUR_API_KEY'); $result = $wrap->add(array( 'EmailAddress' => $subscriberEmail, 'Name' => $subscriberName, 'Resubscribe' => true )); } |
add_action('iphorm_post_process_3', 'my_save_to_campaignmonitor', 10, 1);
function my_save_to_campaignmonitor($form)
{
    require_once dirname(__FILE__) . '/campaignmonitor/csrest_subscribers.php';

    $subscriberName = $form->getValue('iphorm_3_1');    $subscriberEmail = $form->getValue('iphorm_3_2');
    $wrap = new CS_REST_Subscribers('YOUR_LIST_ID', 'YOUR_API_KEY');    $result = $wrap->add(array(
        'EmailAddress' => $subscriberEmail,
        'Name' => $subscriberName,
        'Resubscribe' => true
    ));
}Modify the highlighted lines to suit your setup:
- On line 1, change the number
3to the unique ID of your Quform form, from Step 4 - On line 7, change
iphorm_3_1to the unique ID of the “Name” element in your form, from Step 5 - On line 8, change
iphorm_3_2to the unique ID of the “Email” element in your form, from Step 6 - On line 10, change
YOUR_API_KEYto your Campaign Monitor API key, from Step 1 - On line 10, change
YOUR_LIST_IDto your Campaign Monitor list ID, from Step 2
Custom Fields Example
If you want to save custom fields as well, see the example below. You will need to configure your list in Campaign Monitor to accept these fields, see How do I create and use custom fields?. Set the 'Key' in the code below to your custom field name from Campaign Monitor. To get the form values for additional form elements, just get the unique ID of your form element and call $form->getValue('YOUR_UNIQUE_ID');. To find the data types that are returned from this call for different element types, see Getting form values.
12 3 4 5 6 789 1011 12 13 14 15 16 171819 20 212223 24 25 26 | add_action('iphorm_post_process_3', 'my_save_to_campaignmonitor', 10, 1); function my_save_to_campaignmonitor($form) { require_once dirname(__FILE__) . '/campaignmonitor/csrest_subscribers.php'; $subscriberName = $form->getValue('iphorm_3_1'); $subscriberEmail = $form->getValue('iphorm_3_2'); $wrap = new CS_REST_Subscribers('YOUR_LIST_ID', 'YOUR_API_KEY'); $result = $wrap->add(array( 'EmailAddress' => $subscriberEmail, 'Name' => $subscriberName, 'Resubscribe' => true, 'CustomFields' => array( array( 'Key' => 'age', 'Value' => $form->getValue('iphorm_3_3') ), array( 'Key' => 'sex', 'Value' => $form->getValue('iphorm_3_4') ) ) )); } |
add_action('iphorm_post_process_3', 'my_save_to_campaignmonitor', 10, 1);
function my_save_to_campaignmonitor($form)
{
    require_once dirname(__FILE__) . '/campaignmonitor/csrest_subscribers.php';

    $subscriberName = $form->getValue('iphorm_3_1');    $subscriberEmail = $form->getValue('iphorm_3_2');
    $wrap = new CS_REST_Subscribers('YOUR_LIST_ID', 'YOUR_API_KEY');    $result = $wrap->add(array(
        'EmailAddress' => $subscriberEmail,
        'Name' => $subscriberName,
        'Resubscribe' => true,
        'CustomFields' => array(
            array(
                'Key' => 'age',                'Value' => $form->getValue('iphorm_3_3')            ),
            array(
                'Key' => 'sex',                'Value' => $form->getValue('iphorm_3_4')            )
        )
    ));
}Modify the highlighted lines to suit your setup:
- On line 1, change the number
3to the unique ID of your Quform form, from Step 4 - On line 7, change
iphorm_3_1to the unique ID of the “Name” element in your form, from Step 5 - On line 8, change
iphorm_3_2to the unique ID of the “Email” element in your form, from Step 6 - On line 10, change
YOUR_API_KEYto your Campaign Monitor API key, from Step 1 - On line 10, change
YOUR_LIST_IDto your Campaign Monitor list ID, from Step 2 - On line 17, change
ageto the key of the first custom field - On line 18, change
iphorm_3_3to the unique ID of the form element for the first custom field - On line 21, change
sexto the key of the second custom field - On line 22, change
iphorm_3_4to the unique ID of the form element for the second custom field